 Understanding a Residential Ejector Pump System (With Diagram)
If your home has a basement bathroom, laundry room, or other plumbing fixtures located below the main sewer line, a residential ejector pump system is essential. This system ensures wastewater flows properly into the sewer or septic tank. In this guide, we’ll break down how ejector pumps work, provide a detailed diagram, and offer installation and maintenance tips.
What Is a Residential Ejector Pump System?
A sewage ejector pump is designed to move wastewater from lower levels of a home (such as a basement) to the main sewer line. Unlike a standard sump pump, which handles groundwater, an ejector pump processes both liquid and solid waste from toilets, sinks, showers, and washing machines.
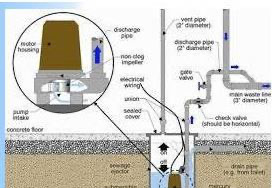
Key Components of an Ejector Pump System (Diagram Overview)
A typical residential ejector pump system diagram includes the following components:
- Basin (Sump Pit): A sealed container that collects wastewater from the lower-level plumbing fixtures.
- Ejector Pump: A motor-driven pump that moves sewage from the sump pit to the main sewer line.
- Float Switch: A sensor that activates the pump when the wastewater level reaches a set height.
- Discharge Pipe: A PVC or metal pipe that carries the sewage out of the sump pit and into the main sewer system.
- Vent Pipe: Allows gases to escape and prevents vacuum formation inside the sump pit.
- Check Valve: Prevents wastewater from flowing back into the pit after being pumped out.
Tip: To prevent clogs and failures, always ensure that your ejector pump is rated for handling solid waste.
How Does a Residential Ejector Pump Work?
- Wastewater Enters the Basin – Whenever a toilet is flushed or a sink is drained, wastewater flows into the sump pit.
- Float Switch Activates the Pump – Once the water level rises to a preset height, the float switch triggers the pump to turn on.
- Sewage Is Pumped Out – The ejector pump pushes wastewater up through the discharge pipe into the main sewer line.
- Check Valve Prevents Backflow – After the pump turns off, the check valve ensures sewage does not return to the sump pit.
Installation Considerations
If you’re installing a new residential ejector pump system, keep these key factors in mind:
- Choose the right pump size – Most homes require a ½ to ¾ horsepower pump for optimal performance.
- Properly vent the system – A vent pipe is crucial to release gases and maintain pressure balance.
- Install a backup system – A battery-powered backup pump can prevent flooding during power outages.
Maintenance & Troubleshooting
Regular maintenance ensures your ejector pump runs smoothly:
Inspect the pump annually – Check for debris, corrosion, and wear.
Clean the float switch – A stuck float switch can prevent the pump from activating.
Test the check valve – Ensure wastewater flows in one direction only.
Listen for unusual noises – Grinding or rattling sounds may indicate a problem.
Common Issues & Fixes:
- Pump not turning on? Check the float switch and power supply.
- Foul odors? The vent pipe may be clogged.
- Slow drainage? The discharge pipe could be partially blocked.
Final Thoughts
A residential ejector pump system is an essential component for homes with basement plumbing. Understanding its function, installation requirements, and maintenance best practices can help prevent costly repairs and potential flooding. By following this guide and referring to a detailed ejector pump system diagram, homeowners can ensure their system operates efficiently for years to come.
Need professional help? If you’re experiencing ejector pump issues, contact us today!
 Adding a bathroom in your basement can increase your home’s value and functionality. However, without proper